WELCOME TO MY PERSONAL BLOG

Welcome

My personal journal blog is a little bit of this and a little bit of that which I love to share with you all here- trough pictures, summaries, articles and videos.

Don't hesitate to leave comment, follow my blog or grab my blog button and when you do, let me know so I can return back your favor.

It is awesome to connect with anyone in any part of the world so sit back and I hope you enjoy your stay here and come back again for more.

Thank You

Welcome to Mignonesia
Showing posts with label Home recipe A la Dita. Show all posts

Friday, April 11, 2014

DIY: HOMEMADE GREEK YOGURT


Do you like yogurt? cuz I do. I like it a lot!

I like both conventional and strained yogurt, all have good healthy benefits but I prefer Greek Yogurt for my foods cuz it contains more protein, less sweet, low fat- some even fat-free! - always check the label when you shop it tho, and its creamy cheese texture is really addictive. 

Since I prefer yogurt than mayo for my foods I always need yogurt stock on my fridge and being love working with my hands, I've been wanting to make my own Greek yogurt so to my curiosity, I did a lil research a.ka browsing :P and I found out that it is actually soooo easy to make! Only need milk , yogurt starter, patience and lots of love, well surprise I have all that! Ha ha

In those articles I read on the net many use fat milk. I don't wont that ofc. I use local fresh milk from Pangalengan instead and its 100% pure cow milk so its good.


Pangalengan is a region in South Bandung, well known for its milk products, the cooling weather and beautiful tea plantations.

I read enough, I got all the ingredients I need but because this will be my first time ever making my own yogurt and particularly Greek Yogurt I only use 500ml of fresh cow milk. I only need like 0.5% of yogurt starter for 500ml of milk so I use half tablespoon of live culture yogurt -I use plain greek yogurt I bought earlier. 

Before I browse, I was confuse about the yogurt starter but not anymore now, There are 2 types of starter culture available to use at home: Fresh yogurt and yogurt Powder.

Hommade or store bought yogurt?

A homemade starter usually comes from your own prev batch, so don't forget to leave some to make your next yogurt once you made home made yogurt. The yogurt should be fresh that's means less than a week old so it still contains enough lactic acid bacteria to ferment the next batch. Lactic acid bacteria decrease with age.

I you bought the yogurt at the store, it should be fresh, unflavored and not pasteurized after the bacterial culture added, Check the label and see if it state live bacteria or something similar.


A dried culture contains bacteria and milk solids. Basically, it's yogurt that's dehydrated and freeze-dried and sold in powdered form.

Method: 


Pour the milk into the pot and bring it almost to boil over medium-high heat. 
Once the milk begins to bubble around the edges of the saucepan, remove it from the stove, cover it with a lid, and set aside and allow the milk to cool. 

Next, when it still warm add and stir the yogurt culture into the milk. 


Stir well


Turn the oven on to its warm setting, or to 110°F and leave the yogurt in the oven for 5-10 hours. 

OR- since I wanted to save energy as much as possible:P, you can use the alternative way instead like I did; I transfered the mixture into a plastic box 


and cover it with the lid [no worry am using safe high quality plastic box from a well known brand but maybe next time I'll try with glass container too].


Well, the weather was so good yesterday, it was about 25 degrees C


so I just placed it under the sun. :D 


but dang 3hours later it gets cloudy outside and I still refuse to use the oven and so I wrapped it with a thick towel instead and place it into a clean carton box [which I forgot to shot] covered the carton box with some news papers and leave them in warm room about 7 hour.

 
Once the mixture has thickened, remove it from the oven or the carton box. 

 
Place a fine clean cheesecloth over a bowl or plastic tube like I did. Tie the cheesecloth in place, leaving several inches of space between the bottom of the bowl and the clean cheesecloth. 


Pour the yogurt mixture into the clean cheesecloth and place it in the refrigerator overnight.
.

In the morning the yogurt should be nice and thick. The liquidy whey should be at the bottom of the bowl. Discard the whey. 


 Transfer the yogurt to a nice bowl. It's now ready to be eaten. 


The homemade Greek yogurt will stay fresh for a week when placed in a jar, covered with the lid and stored in the refrigerator but I think I will finish it in just two days ha ha


 Yes, the good thing about homemade Greek yogurt is you can keep the whey.


Yogurt Whey contains calcium, the mineral linked to bone health. It's also a good source of potassium and vitamin B-2 so I definitely have to keep it and will instead using water or milk, I will just use whey for my smoothies, oatmeal even soup for added protein.

Soo many health benefits in Greek yogurt  it just wow me in many ways and am glad I can make it myself now coz this way I can control the ingredients I am using.

Some might not like Greek yogurt. Well, am not a nutrition expert but many good articles out there you can browse that can explains better, maybe this one HERE can be a good start.

I love eating and cooking but I don't want to let go myself and get fat so am dieting always and on the same time I want to stay healthy therefor I cant be ignorant. I need to be smart, keep myself well informed by browsing and read, read, read and learn how to cook or how to pick the right and good foods, learn the best way to process the foods to get the max health benefits, omg its so FUN I tell ya!

Eat smart and stay fit! I word that. YAY

#signingofftofinishmyfreshrawfruitsaladummmyumm

Source:
Wikipedia
yogurtfromhome.com
probiotics-help.com
kitchenepic.wordpress.com
chobani.com
health.usnews.com
livestrong.com
fitnessmagazine.com
webmd.com
foxnews.com
oprah.com 
doctoroz.com
huffingtonpost.com

Sunday, June 23, 2013

MY INDONESIAN RISSOLE RECIPE.


Heloooow averyone! How is your weekend? Mine is awesomaticsuperbetic.

You know what? I am soooo in my cooking mood this week.
I've tried easy recipes of the foods I can make AND, I spent the whole Monday morning today, making one of my favorite snacks: Risoles, as shown in the pic. ᕙ(`▽´)ᕗ

There's many different versions of Rissoles from all over the world. In Indonesia its a very popular appetizer. They sell it in the market, bakery or even along the street. Here, local call it Risoles-pronounced 'riss-ol-less. You might find it similar with spring rolls but the taste and how to make it is a little bit different. The name of Risoles is borrowed over from the traditional Portugues, rissóis but unlike Brazil risoles, Indonesian risoles have a crepe-like wrapper that you fill and roll up, and then deep fry.

Anyways, I also have my own Risoles recipe version and in this post, I will share the recipe and show you the step by step how I cooked it. Its yummy, trust me! (✿◠‿◠)

First, lets make the Wrapper Batter.


For the wrapper batter, I use:
250 grams of  medium wheat flour
1 egg 
1 mug of milk 
1 tea spoon of salt.

Mix all the ingredients together and gradually add the milk. Whisk them to make smooth texture.


My wrapper batter was a bit too thick so I decided to add a bit of water into it.


The Second steps is, cook the wrappers.


You can heat up a nonstick pan over medium-high heat to cook the wrappers or you can simply use a special crepe pan like I did.


My wrapper batter is enough to make about 15 wrappers. 
Set them aside and go to the next steps

Next step is, make the filling!


The Risoles filling à la Dita are:

A weizen glass of Milk
 100 g Carrots, cut into small cubes
100 g Potatoes, cut into small cubes
100 g Green Beans, chopped
50 g Corned Beef
50 g Cheddar cheese, grated or cute into cubes
50g Spring onion
1 ts Garlic Powder
1 ts Pepper
1 ts Salt 


Cook all the ingredients in medium heat and as you cook, also add:
1 1/2 ts margarine 
1/2 ts of  beef bouillon powder


Mix them well for few minutes, then add:
  1 egg 
2 tablespoon of flour to make the filling ticker 


Continue cooking until they are tender.


The Risoles filling à la Dita result. (>‿◠)✌


Fun Part: Make the Risoles!


Take one Risoles's wrapper and then add the filling in the bottom. 
I use 1 table spoon for each. 
Fold the wrapper anyway you like lol, like a bos. Mine are triangle and the traditional roll out.
I liked the triangle shape but man, that was hard!
Anyways, repeat until all the wrappers are finished.

 Dipping the Risoles.


For the Risoles coat, I use:
2 egg whites [beaten] 
125 g bread crumbs

Dip the rissoles into beaten egg then roll them onto the bread crumbs. 
 
 
After about an hour in the kitchen, my roll out and triangle Risoles in different sizes are done.
Put them on the fridge and wait about 30 minutes so you wont having trouble keeping the Risoles together.
In the meanwhile, I use that 30 minutes waiting to clean all those mess in my kitchen.:P


Serve the Risoles.


After 30 minutes on the fridge, fry the risoles until they are golden brown.

Serve the Risoles with spicy Tomato Mayo and grated cheddar cheese like I did or if you like it really spicy, you can always serves it with whole fresh chillies. Both are YUM
 
Anyways, Since I cant eat all the resoles all by myself- I am home alone this weekend, so I decided to rest the uncooked ones in the fridge and cook them tomorrow. 

You can keep the uncooked Risoles and they stay fresh on the fridge for about two days max.

FYI.

Do you know How Indonesian serves Risoles?

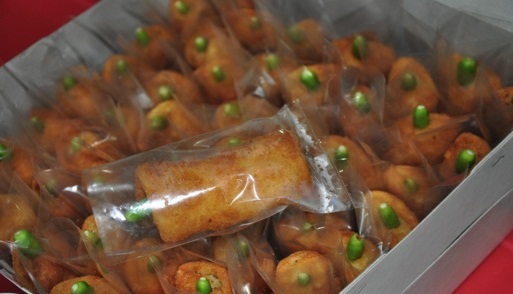
Risoles in Indonesia usually served in unique way; with fresh chilies tucked onto one of the ends of Risoles, like shown in the pic below. Uh Oh.
 pict source: nonikitchen.blogspot.com

Well, that's my Risoles recipe. Stay tune for more updates from me at Mignonesia.  


Much ♥!


Tuesday, December 13, 2011

ETHNIC RECIPE- RUJAK BEUBEUG


Helloooooo peps!

Yep am back! See the pic above? that's pic of Rujak Beubeug that I proudly made by myself, thank you.
It tasted hot, sour, sweet and refreshing.

I can't always buy Rujak Beubeug because the vendors are quite rare now and should I say that I am agree with you who probably afraid getting food poisoning when you buy foods from traveling vendors.

I am not saying buying foods from street or traveling vendors in Indonesia - particularly in Bandung are bad coz there's many vendors who also smart and have good health and hygienic awareness but you always have to be very selective before you decide to buy from them unless you have stomach made from steel hehehe.

Even the locals who are used with the street foods, they occasionally gets food poisoning too so in case you're not sure if you want to buy Rujak Beubeug from traveling vendor or not sure if you could find one when you visiting Bandung then why not try to make it your self at home.

It's simple and easy to make, everyone can make it and as I promised you on my previous post here, I am going to share the Rujak Beubeug's recipe on this post.

Like other typical Indonesia fruit rujak, Rujak Beubeug also consist of assorted tropical fruits.

I wrote the fruit name in Sundanese language and fruits you need to make Rujak Beubeug are :
 
Ganas (pineapple)
Buah atah (unripe mango)
Kadondong (Ambarella /hog plum)
Bangkuang (jicama)
Hui beureum (sweet potato)
Balimbing (starfruit)
Jambu  (wax apple)
Cau Batu (Wild type/ wt Banana)
Jeruk Bali (Pamelo fruit)


Ingredients to make the sauce:

1/2 tube/block Gula Kawung (Arenga Sugar)/ Red Sugar
I prefer Gula Kawung coz it taste better and rural people in west Java love to use it but you can also use coconut sugar, if you can't find it.

3/4 tsp Terasi Udang (Fermented Shrimp paste) -roasted
To roast, wrap piece of terasi in aluminum foil, place in skillet, heat on high fire for couple minutes , just until you can smell the terasi.

Cengek/Cabe Rawit (Green chili padi) -if you like

1/2 ts Salt

Method:

Coarsely chop all fruits-you only need 3 to 4 chops for each fruit to make a portion of Rujak Beubeug like shown on my picture above, then put the coarsely chopped fruits into a wooden mortal- I hope you have one. In my case, I use a stone mortar.

Add the ingredients and pound until all the fruits and spices crushed.

When you finish, stir well to combine and serve at room temperature.

For those of you who might not familiar with some of the tropical fruits and ingredients  I mentioned above, here's their pictures to save your time from googling. :)

All these tropical fruits are easy to find here at my place.


                                                                  Ganas/ Nanas (pineapple)
Ganas - in Sundanese language or Nanas in Indonesian Language contains lots of vitamin C. Its sour, sweet and juicy. Very refreshing.

The only thing I complain is when I peeled its skin- I really hate this part but I like its sour taste especially when you eat it in a hot day.

                                                            Buah atah (Mangga) / Mango

I use my older post picture here. That's mango from one of our house's backyard. Fresh from its tree. Chose only the unripe mango for rujak Beubeug.

                                                  Kadongdong (Kedondong) /Ambarella /hog plum

very crunchy, has slightly sour taste, fibrous, it has single seed with many stiff filaments. Kedongdong or Kadongdong in local is a must for Rujak beubeug but if you cant find it then maybe you can use tart apple like Granny Smith.


                                                         Balimbing (Belimbing) / starfruit

This is one of my fav fruits. I like the taste and the star shape, I just love it and its also a must fruits for Rujak Beubek, without it the rujak wont taste yummy.

                                              Jambu Air (samarangense/ wax apple)
 
This is the type of Jambu air that commonly used for Rujak because it taste more sour than other type of Jambu air. Locals often say here, "If it not sour, sweet and hot, than it's not Rujak ." :)

                                                               Bangkuang ( Bengkoang) / jicama 

Bengkoang comes with various size, this one is the small one. Locals eat it raw. You can not only eat it but use it for your skin care. Bengkoang also used by many cosmetic companies in Indo as one of their ingredients for natural whitening products.


                                                   Hui Beureum (Ubi merah) / Red sweet potato

Ubi merah is very essential on Rujak Beubeug, without it the rujak will not taste like it should.
I know its vegetable not a fruit. :P

                                                            Jeruk Bali (Pamelo fruit)

Oh I can eat all of them by myself LOL. I like all kind of oranges and this one is also my fav.

                                                      Pisang Batu (Wildtype Banana)

It has numerous large and hard seed, its also a must on typical Sundanese Rujak, its coarse taste really  enrich the rujak's flavor.

                                        Cengek (Cabe Rawit) / Chili Padi or Bird Chili

Red or green, its hot! Some Sundanese peoples can not do whithout this capsicum with their meals! :D

                                                     Tasi udang (Terasi Udang) / Shrimp Paste

Is common ingredient use in Indonesian cuisine, made from fermented group shrimp, sun dried and it sold either in bulk or cut into fist-sized rectangular blocks.


                                           Gula Kawung (Jawa Kawung) 

or Gula Kabong? I dunno how you guys call this there but it looks like shown in the picture above

It made from the sap of male of the male inflorescence of the palm Arenga pinnata.

What so special about it? Gula Kawung or palm sugar is brown and sweeter. You don't have to use a lot in the recipes. Plus it gives a richer sweet taste.

I hope you could find these fruits and the ingredients, so you make your own authentic Rujak Beubeug, if not then you should come to Bandung hehehe.

Some of these fruits can be bought at supermarket and some only available at traditional market.

Happy hunting from me and stay tune for more update! :)


source:
Personal expereience
Wikipedia

Image fruits and ingredients are courtesy of:

http://www.flickr.com/photos/ummabdrahmaan/4278288203/
http://cikidong.com/blogs/2011/01/jus-belimbing/
http://www.dnull.com/jambu-air/
http://www.flickr.com/photos/totaltravel/1260159716/
http://districtservices.com/ketela-ungu
http://www.flickr.com/photos/javanesejive/1514828325/
http://www.flickr.com/photos/tk_yeoh/60001309/
http://belikrupuk.com/7-terasi-udang
http://forums.egullet.org/index.php?/topic/44433-kuih-kueh/page__st__60

Saturday, February 19, 2011

CARROT CAKE A LA DITA ! ^-^


Hello hello hello my lovely reader and visitors, how is your weekend so far? mine is busy with cake project! Ha Ha

I got too much carrot on my fridge- not because its the year of rabbit tho wkwkwkwk, I just stocked too much of it.
I didn't know what else I should do with them so I decided to make a cake with it.

I was a bit nervous because am not gud in baking  BUT  this morning, I manage to make a Carrot Cake! Ta daaaaaaaa!
See, I did it!!! :)
Oh I even like the color, its looks pretty and that's fresh from the oven when I snapped the pic LOL
 
I am eating a slice of my carrot cake while am typing this mm yum yum....you want one? then you should make one hihihi

I am not a cake expert and its my first time making it Ha ha so its A la Me :P  and fear not as I love love love to share the recipe with you all here. Pssst, no need to call 911:)
 
Here's the ingredients I use:

250 grams flour
200 grams margarine
200 grams sugar
220 grams grated raw carrot
3  eggs
2 table spoon of lemon juice

Here's the method I did:

1. Preheat your oven to 170C. Grease a 25 cm round cake pan lightly with margarine

2. Put Flour in separate place and set a side

3. Place margarine in large bowl. Using an electric mixer, beat it with sugar until well combined and smooth.

4. Pour the mixture margarine into flour and continue beat with the mixer till combined. 
    Using wooded spoon, stir in grated carrot and add the lemon juice.

5. Pout the mixture into the pan and bake for 45 to 50 minutes. Cool in pan. Turn onto plate. Serve.

Note:
I don't want to use too much sugar so my Carrot cake isn't too sweet  but you can add some honey and spread it over the cake if you like 

So there you have it: the carrot cake A la Dita recipe! Do try it at home :)

Enjoy your weekend and stay tune for more post updatse from me at Mignonesia. 

XOXOXOXOX


Friday, February 04, 2011

HEALTHY FRESH DRINK A LA DITA


Ever got dehydrated? well if you don't drink enough you will.
See here in Indonesia we enter dry season and boy its sooo hot during the day and this fresh drink will makes a great afternoon treat or weekend refresher so let me share the recipe to you.

Here's the ingredients :

200 grams cucumber
3 lemons
4 ts honey
2 ts warm water
Fresh mint leaves for garnish
Ice cube (optional)

I want my healthy drink as natural as possible so I don't use my juicer or my food processor and made the juice by  hand instead of course after I wash them first, so here's what I did:


1. Grate the cucumber and squeeze the gratered cucumber till the juice out. Chill
2. Squeeze the juice of the 3 lemons. Chill
3. Add the warm water into honey and stir them till dissolve. Chill 
4. Fill the glass with Ice cube and top with sliced cucumber, pour the honey followed with hand squeezed lemon juice and cucumber juice. Garnish with fresh mint leaves and served. 

*Before you grate all the cucumber, you might need to save some sliced cucumber for the garnish. 

Little scared of how it might taste? Well, it tastes good, refreshing and the plus its really healthy! So take a taste and enjoy a bit of  fresh drink A la Dita for the best cool off! ^-*


Monday, May 03, 2010

Recipe à la Dita: Guava Soup


Hello everyone! how was ur Sunday? Well mine is great! I started jogging on Sunday now and I cooked a delicious dessert and its great to enjoy on hot weather like we had right now in Indo. Yups after jogging, I stopped by at a traditional market to shop some fruits and I saw "Red" Guava. What first come to my mind was Guava soup! Hahah so I bought some and next thing I know I am busy cooking Guava Soup in the kitchen. Its easy to make and doesn't take much time to cook. Btw, I will post how Guava rich with vitamin C and antioxidant for Cancer etc on my Back to nature-Herbal.
Yes, go check it later lol.;-)
Now let me share the recipe of Guava Soup à la Dita.^^

What u need,

500 grams "Red" Guavas
(Cut into bite size pieces)
150 grams Palm sugar
4 cups of water
100 ml thick coconut milk
12 cm cinnamon stick
5 cm ginger (sliced)
1 Pandan leaf (tied in a knot)
1/2 ts Salt to rich the flavour

How to make,

*Bring water and the coconut milk to boil and simmer for around 2 mins.
*add ginger, cinnamon, pandan leaf to the simmering coconut milk
*Add palm sugar and stir till the palm sugar dissolves.
*Add salt and the guava and mix
*Serve chilled

Enjoy!^_^


Dita's tips:

* The guava should stay crounchy with its fresh color to maintain its nutrient benefits and vitamins so I always take it off the fire after less than 2 mins that is when the guava pieces are still floating. Yum Yum

*Remove the pandan leaf when it served.

*I found these after googling ok,

You can find Pandan leaf as herb, the essence is known as "Kewra" in Indian store or screw pine leaves in Asian stores- check the frozen section.

Bay leaf is a close alternative with a bit of tarragon and dried basil.

Or replace it with 1ts vanilla essence and stirr it just before you put off the heat.

Happy hunting!:-)

Wednesday, March 31, 2010

Healthy life style- Violà, Cap Cai à la Dita..^_^


Cap Cai is one of my fav Indo chinese influenced food. This food not only pretty when served as it looks like a rainbow but also very healty. The word of "Cap Cai " is from Chinese Fujian dialect which means mixed vegetables. While in America, this dish known as Chop Suey. Many people think that this recipe must use ten vegetables bcoz the word of Cap in fujian dialect very much resemble to the word "Cap" from the same dialect which means ten but actually many type of vegetables used is not important. The original Cap Cai will include chicken, shrimp and meatball but on Cap Cai à la Dita, I replaced them with champignon so its gud and suitable for vegetarian, those who has cancer or tumor, those whos on diet or for anyone who just want to enjoy healty food. All vegetables I use for this dish are organic and cooked in stainleess steel wok with low heat- less than 190°.
Bon appetit.^_*

Healthy life style- Cap cai recipe à la Dita..^_^


Ok, heres what we need: 200 grams organic carrots
100 grams organic brocoli
150 grams organic champignon
100 grams organic Pak Coy Baby or Caisim
100 grams green peas
200 ml water
2ts vegetables oil
50 grams organic tomatoes [sliced],
4 cloves garlics
1/2 big indian onions [sliced]
1 inche fresh ginger
1ts cornflour dissolved in 50 ml of water.
Pepper and salt

How to cook:

*Heat oil.
*Sautée garlic and ginger untill it smells gud.
*Add indian onions, sliced tomatoes, stir untill whither.
*Add carrot, cook until they whither.
*Add water, cook until boiled.
*Add brocoli, green peas, champignon and Pak Coy Baby. Cook until the vegetables are crisp but still fresh.
*Add the solution of cornflour, add pepper and salt to your taste then stir a bit untill the sauce is thick enaugh.
*Serve hot Cap Cai à la Dita with hot steamed organic rice.